
 Português
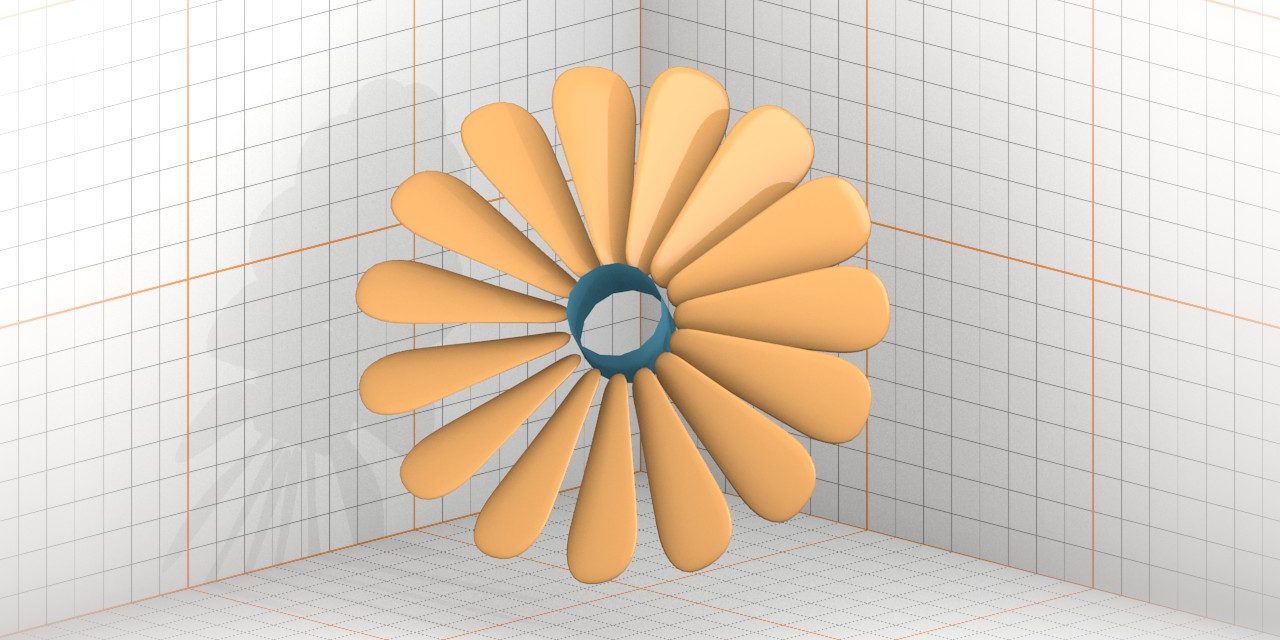
When you want to make shapes like a fan, flower, stars, signals, or any radial symmetry in Blender, you already know that doing it manually just with rotate and copy never was a clever thing to make it, is not it? This tutorial brings two simple methods to make a radial symmetry shapes. The first is faster but static, and next is a bit more difficult but dynamic.
The Quick Method
The quick way is in Edit Mode, where there is a tool called “Spin”, that makes copies of selected meshes in… spin format. This method is adequate if you are sure that the symmetry segment is okay to apply, and is very simple to do it.
-
In Edit Mode, be sure if the 3D Cursor is on the right place, because it is the center point of Spin tool.
-
Just press Alt+R or click Spin on Tool Shelf to apply.
-
Adjust the Angle to 360º, and turn on Dupli to make duplicates instead of a bridge of segments.
-
The option Steps defines a number of segments that you want.
-
If you move the original selection off the Spin, you will notice a double of vertex.
Is clear that this method creates a static symmetry, it means, editing one of the segments don’t affect the others.
The Dynamic Method
This method you just need to add a cylinder without caps and use DupliFaces where you can find on Object settings. This is great for a better preview of radial symmetry, and you can apply as Duplicated objects and Join them as single Object, and not only that, is good to make some kinds of animations. Is not so difficult, but it’s worth.
-
Add a Cylinder and see the following settings:
-
Using the Vertices value defines the number of segments.
-
Adjusting the radius makes the distance of segments from the center.
-
The Cap Fill Type must be set to Nothing.
-
The Depth is not relevant unless you turn on the Scale option of DupliFaces.
-
-
For you work with a preview of symmetry, you must make a linked duplication (ALT+D) of the segment. This duplication is the object that you’ll use to edit the meshes.
-
The cylinder must be the parent of the original segment.
-
Then, in Object properties of the cylinder, activate the Faces option of Duplication.
If you’re not satisfied with amount or distance of segments, the tip is delete and add the Cylinder through of Edit Mode, and adjust the settings for the new cylinder.
To convert the DupliFaces to objects, just select the cylinder, and press Ctrl+A, then click Make Duplicates Real (or just press Shift+Ctrl+A). 😀
Final Considerations
This tutorial may even be an excuse to teach the DupliFaces, but let’s consider a simple idea. Try to practice both methods, and decide which is most appropriate for the modeling situation.
Almost was posted the third idea, but the use of curves and arrays did not make an exact radial symmetry, and would be called “Automated Method”, but with the reality of the results, the best name was “Flawed Method”, tsk… Maybe we can talk about this combination of curves and array in future ideas. Haha!
[toggle title=”Quick Note” state=”closed”] If you have read the previous post, then you may have noticed that animation format is changed from gif to webm. This was because of technical failures of my computer that makes me without Windows, it means, I cannot use the ShareX on Linux, and I don’t want to uninstall the Linux, nor use WINE to try run it.
Indeed, capture with Blender screencast and convert to webm with ffmpeg is a good alternative.
And you, which format do you prefer? With webm or with gif? Please, leave your comment in this post! 😀 [/toggle]


